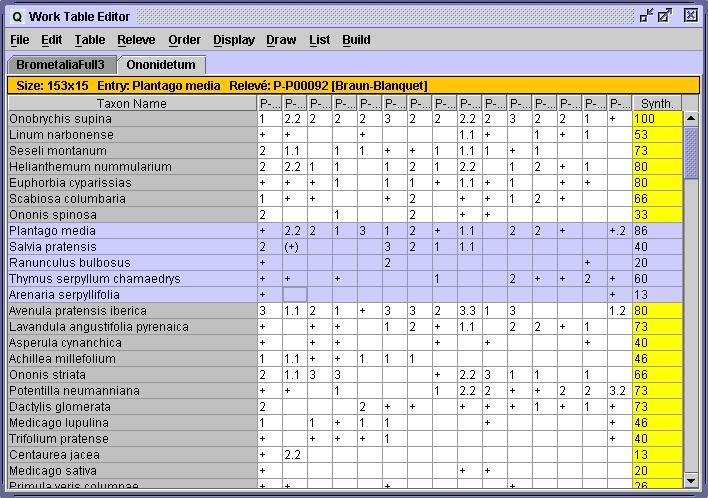
Work Table Editor
The general aim in this module is to enable the following functions:
- Arrange relevé table columns and rows for presentation.
- Generate suitable outputs for analysis.
- Generate synoptic relevé tables.
- Describe table properties and statistics.
Important note: Every document in this module is a Releve Table File, which appears as a tab in the work editor. While file type is the same as in Primary Table Editor, the functions in this editor are completely different. It is highly recommended to save source and work relevé table files in separate directories so as not to confound them. A working table can have its original source entries modified, or joined, so it's not longer an original table. Thus, it should be differentiated from a true source table.
Page contents:
3. Filtering and Joining Table entries
5. Displaying Table Information
1. Work Relevé Tables
1.1 Generating Work Releve Tables
Work tables can be started mainly in two ways:
1) By creating a 'new' Work Table (File menu)and then loading all the primary releve tables necessary by using 'Add Primary Releves' or 'Add Work Relevés'. In that case, a dialog with the list of primary tables or work tables (respectively) currently in the project will be displayed. The relevés of the selected releve table files will be packed up and added to the current work table document.
2) By building releve selections using the project Manager. See Building new work tables from primary selection section in Project Manager.
Commands in Work Table Editor related to Relevés are:
|
Command
|
Menu
Item (Relevé Menu)
|
KeyStroke
|
| Add relevés to this work table from other work tables | Add Work Relevés | |
| Add relevés to this work table from primary tables | Add Primary Relevés | |
| Displays a non editable dialog with the releve information for the current column. | Show Selected Relevé | |
| Reload relevé(s) from primary tables by parsing tables looking for equal relevé codes. | Reload Selected Relevé(s) | |
| Remove relevé(s) from table | Remove Selected Relevé(s) | Shift-Del |
|
Command
|
Menu
Item (Display Menu)
|
KeyStroke
|
| Shows associated Data Matrices (Ecology, Structure, Geography) for the selected Relevé. Those values are not editable. | Associated Data Matrices | |
|
Command
|
Menu
Item (Edit Menu)
|
KeyStroke
|
| Clear table | Clear table | Ctrl+Shift-Del |
1.3 Additional Synoptic Column
An additional final column can be displayed in a relevé table showing syntetic information. This column (in yellow in the table) is dinamically modified when doing operations on the table.
Shows a dynamically modified synoptic column Show Synoptic Column Switches synoptic column Display Mode from Latin to Numerical Change Synoptic Column Display Mode F2
2. Arranging Rows and Columns
One important feature of Work Table Editor is its capability of moving table rows and columns. To switch from column move move to row move mode and viceversa one must choose Change Move Mode in Display menu.
When some rows or columns are selected, one can move them to another position in the table by right clicking in the desired position. In that case, a menu pops up and we must choose Move Selected Here. Apart from this way of moving rows and columns, one can prefer the more typical cut-paste operations, available on the 'Edit' menu.
By right-clicking in table row positions one can insert and delete comments between species entries in order to specify different row sections of the table. This is only available when editing the table in row move mode.
|
Command
|
Menu
Item (Edit Menu)
|
KeyStroke
|
| Copy selection from the table | Copy Row/Column | Shift-C |
| Cut selection from the table | Cut Row/Column | Shift-X |
| Paste selection to the table | Paste Row/Column | Shift-V |
Taxon entries can be automatically ordered following a selected ordering criterium. The available options (Order Entries By... submenu) are shown in the following table:
|
Command
|
Menu
Item (Order Menu)
|
| Orders table entries by their taxon name in ascending order. | Order Entries by ... taxon name |
| Orders table entries by their taxon name code in ascending order. | Order Entries by ... name code |
| Orders table entries by their taxon internal code in ascending order. | Order Entries by ... internal code |
| Orders table entries by their diagnostic value in a selected syntaxon subtree. | Order Entries by ... diagnostic taxons |
| Orders table entries by their layer in ascending order. | Order Entries by ... layer |
| Orders table entries by their total row abundance in ascending order. | Order Entries by ... total abundance |
| Orders table entries by their mean abundance in ascending order. | Order Entries by ... mean abundance |
| Orders table entries by their constancy in ascending order. | Order Entries by ... constancy |
Analogously Relevés (columns) can be automatically ordered following a selected ordering criterium. The available options (Order Relevés By... submenu) are shown in the following table:
|
Command
|
Menu
Item (Order Menu)
|
| Orders table entries by their relevé code in ascending order. | Order Relevés by ... code |
| Orders relevés by their total column abundance in ascending order. | Order Relevés by ... total abundance |
| Orders relevés by their number of entries in ascending order. | Order Relevés by ... number of entries |
Its important to note that ordering is applied to all table if less than 2 rows or columns are selected. Otherwise the ordering is applied to the current selection of rows or columns.
3. Filtering and Joining table entries
The following options parse all table rows to join or filter table entries. Sum options can generate new entries which replace the old ones and are placed at the end of the table, so it may require reordering after. Filter eliminates the entries which do not fulfill a given condition.
|
Command
|
Menu
Item (Table Menu)
|
| Makes all layers to have the same layer (0-no layer). Some entries may be joined. | Sum... layers |
| Makes all layers to have the same sureness (0-Ok). Some entries may be joined. | Sum... sureness |
| Sums all subspecies taxons in one species taxon entry | Sum... infra-species |
| Filters all layers not selected in a dialog | Filters... layers |
| Filters all surenesses not selected in a dialog | Filters... sureness |
| Filters supra-species (genus level and above) taxon entries | Filters... supra-species |
| Filters infra-species (subspecies and below) taxon entries | Filters... infra-species |
| Filters entries with low presence in the table | Filters... low presence entries |
| Filters entries with low mean abundance in the table | Filters... low mean abundance entries |
| Filters entries with low total abundance in the table | Filters... low total abundance entries |
| Filters entries whose taxon name is not recognized in thesaurus | Filters... non-recognized taxons |
Other options are concerned with taxon codes manipulation. This enable a
Converts name synonyms to their valid names and join them with other entries if required. Apply Table Name Synonyms Converts analysis synonyms to their analysis taxons following the taxon thesaurus and joins them with other entries if required. Apply Thesaurus Analysis Synonyms Converts analysis synonyms to their analysis taxons and join them with other entries if required. Update Table Codes following Thesaurus Converts analysis synonyms to their analysis taxons and join them with other entries if required. Clear Table Internal Codes
4. Undoing/Redoing editions
An important feature for work table edition is the capability of undoing editions. Undoing is handled by Edit menu options:
Undo last edit Undo [...] Shift-Z Redo last edit Redo [...] Discard all previous edits Discard all Edits
5. Displaying Table Information
5.1 Text Displays
Table Text outputs is shared with the other table editors. See Table Listing for a coverage of this topic.
The following options are graphical outputs available in Quercus:
|
Command
|
Menu
Item (Display Menu)
|
| Plots an histogram showing how many relevé entries have a total abundance belonging to a given class. | Plot Frequency Histogram by... Abundance |
| Plots an histogram showing the frequency classes of relevé entry presence in relevés. | Plot Frequency Histogram by... Constancy |
| Plots an histogram showing classes of number releve entries | Plot Frequency Histogram by... Number of entries |
| Displays relevés UTM distribution in a Map. Only woks with a Map Configuration active in the Quercus project. | Plot Releve Distribution |
6. Building Synoptic Tables
Work Table Editor enables the building of synoptic releve tables. If relevés in the table have the current syntaxon field filled with a suitable syntaxon code, then it is possible to build a synoptic table form the work table by using the option 'Create Synoptic Table' in Build menu. In such table, each column will be a synoptic relevé, which is build by using all the relevés that share the same current syntaxon entry. Each entry in the synoptic relevé has a value corresponding to the proportion of how many original relevés contained that entry.
Syntaxon codes can be translated to syntaxon names. For that, it is necessary to have a syntaxon thesaurus in the Quercus Project. If the syntaxon thesaurus is available, the synoptic table can be build at any syntaxonomic level above that of releves current syntaxon.
Alternatively, work table relevés can constitute a synoptic columns without regarding to the syntaxon adscription of relevés. Those columns can be build using the option 'Create Synoptic Column(s)'. A dialog will be prompted to select which relevés from the ones available in the table are to be used to create the first synoptic column. This Dialog will be prompted again as long as user wants to build more synoptic colums. When no more synoptic columns are desired, user chooses Cancel and all the columns will be displayed in a single synoptic table.
7. Analysing Work Tables
7.1 Analysis tables
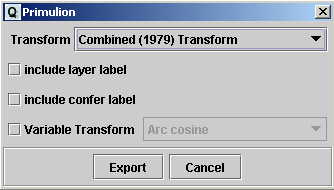
One of the aims of Work Table Editor is to make vegetation relevé tables ready to be analysed (by Ginkgo or whatsoever multivariate tool). Once a work releve table is ready, it can be transformed to a data matrix of size n x p, where 'n' is the number of relevés, and 'p' is the number of taxon entries in the table. It is done by selecting Create Taxon Entries Analysis Table in menu Build. The created matrix can be saved in tabulated text file or copied into the clipboard and pasted into GINKGO (another VegAna Program). Matrices copied into clipboard can be pasted in other software as well.
A dialog is prompted to select transforming options and other:
Transform:: We must specify which transformation of Braun-Blanquet scale values we want. The available transformations come from:
[E. van der Maarel (1979) Transformation of cover-abundance values in phytosociology and its effects on comunity similarity. Vegetatio 39-2: 97-114]
Include layer label : Includes the layer in the names of the variables to be created for the matrix. In case of entries of the same species in different layers this option should be activated but it is not generally necessary.
Include confer label : Includes the sureness in the names of the variables to be created for the matrix. In case of entries of the same species but with different surenesses this option should be activated but it is not generally necessary.
Variable transform : Enables the transformation of the numerical values (computed after BB transforms, if necessary).
7.2 Partitions
A partition following syntaxonomy of the table can be created by using Create Partition item in Build menu. The syntaxonomic Level of the partition will have to be choosen. Again, the resulting matrix can be saved in text format or copied to the clipboard for further usage in GINKGO.